 Save to Pinterest
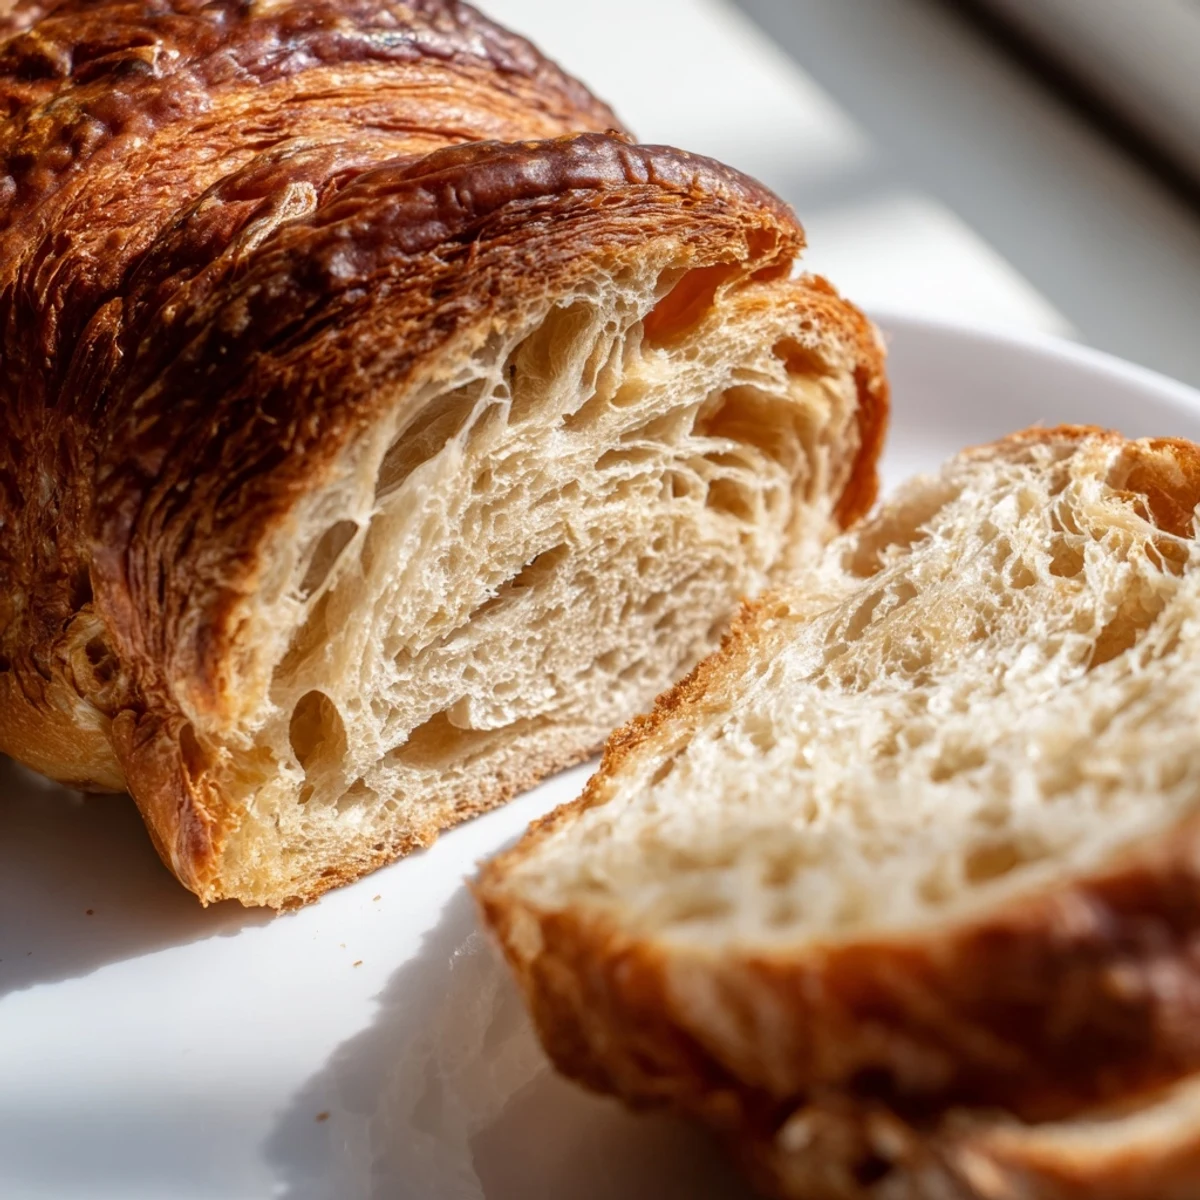
 This French-inspired creation brings together all the buttery, flaky goodness of traditional croissants in a convenient loaf shape. Through careful lamination and multiple folding turns, layers upon layers of tender dough form, creating that signature texture pastry lovers adore.
The process requires patience with rising and chilling times, but the reward is a golden bakery masterpiece that shatters beautifully when sliced. Each wedge reveals the intricate honeycomb structure inside, perfect for toasting and spreading with your favorite jam or honey.
The kitchen was still dark when I started, just the blue glow of dawn creeping through the window. I had this wild idea to merge the lazy comfort of sliced bread with the flaky magic of croissants, even though every pastry chef I knew warned me it was ambitious for a Tuesday morning. Six hours later, my kitchen smelled like a French bakery and I was covered in flour, holding something that defied explanation but delivered pure joy.
My sister called me mid way through the folding process, confused why I was folding dough like a letter instead of proofing it like normal bread. She stopped asking questions when I showed up at brunch with this golden loaf, and we spent the next hour just pulling apart sections, marveling at the honeycomb structure inside. Now she texts me every few weeks asking when Ill make another one.
Ingredients
- All-purpose flour: Creates structure while staying tender enough for those delicate layers we want
- Instant yeast: Reliable performer that gives steady rise without complicated activation steps
- Whole milk: Adds richness and helps develop that golden brown crust we all love
- Unsalted butter: Both melted in the dough and cold for laminating, controlling the sodium ourselves
- Eggs: One for dough tenderness, plus another for that professional looking glossy finish
- Sugar and salt: The perfect balancing act that enhances flavor without making it sweet
Instructions
- Mix the foundation:
- Combine flour, sugar, salt, and yeast in your largest bowl, keeping salt and yeast separated like they are in a fight. Pour in lukewarm milk, melted butter, and egg, then mix until everything comes together into a shaggy, sticky mass that feels promising.
- Build the structure:
- Knead for 7 to 10 minutes until the dough transforms from sticky to smooth and elastic, bouncing back when you poke it. Let it rise in a greased bowl for 1 hour until it doubles, watching in wonder as yeast does its invisible work.
- Chill out:
- Punch down the dough gently, shape it into a rectangle, and refrigerate for 30 minutes until firm but not rock hard. This chill period makes everything easier to handle and prevents butter from melting during our upcoming folding adventure.
- First fold:
- Roll dough into a 12 by 16 inch rectangle on a lightly floured surface, feeling resistance but pushing through. Arrange cold butter slices over two thirds of the dough, then fold like a business letter, bringing the naked third over butter, then folding the remaining third down on top.
- Second fold:
- Roll again into that same 12 by 16 inch rectangle, fold into thirds, wrap, and chill for another 30 minutes. The dough might protest, but this process builds those gorgeous layers that make everyone gasp when they slice into the finished bread.
- Final turns:
- Repeat rolling and folding two more times, chilling between each turn, for a total of three complete turns. After the last chill, roll dough to 8 by 16 inches, then roll it tightly from the short edge like sleeping bag, creating a spiral of layers.
- Final rise:
- Place the log seam side down in a greased 9 by 5 inch loaf pan, cover loosely, and let rise until doubled, about 1 hour. Meanwhile, preheat oven to 375 degrees and whisk together your egg wash for that bakery shine.
- Bake to perfection:
- Brush the loaf gently with egg wash, bake 35 to 40 minutes until deep golden brown, tenting with foil if it is coloring too fast. The bread should sound hollow when tapped, signaling the interior is fully cooked through.
- The hardest part:
- Cool in the pan for 10 minutes, then transfer to a wire rack and wait until completely cool before slicing into it. I know the smell is intoxicating, but cutting warm bread will steam those beautiful layers flat.
 Save to Pinterest
 The first time I made this, I invited neighbors over just so I would not eat the entire loaf myself standing at the counter. We sat around the table with warm slices slathered in butter and homemade strawberry jam, listening to the satisfying crunch of the crust. Something about tearing into those layers makes conversation stop and smiles appear.
Temperature Secrets
Cold ingredients are your best friend during lamination, creating clean layers instead of a buttery blur. I chill my rolling pin and even my hands under cold water before starting each fold. The kitchen temperature matters too, aiming for under 70 degrees if possible, or working faster on warm days.
Flour Wisdom
Use just enough flour on your work surface to prevent sticking without incorporating excess into the dough, which can make the bread tough. I keep a small bowl nearby and sprinkle lightly, brushing off any excess with a pastry brush before each fold.
Storage Solutions
Wrap the cooled loaf tightly in plastic and store at room temperature for up to 2 days, though it rarely lasts that long in my house. For longer storage, slice and freeze individual pieces, toasting directly from frozen for breakfast all week long.
- Refresh day old bread in a 350 degree oven for 5 minutes to restore some crispness
- The slices freeze beautifully and toast up perfectly from frozen in about 3 minutes
- This bread makes exceptional French toast, turning weekend breakfast into something extraordinary
 Save to Pinterest
 There is something deeply satisfying about making bread that looks impressive but tastes even better than it appears. Every time I pull this golden loaf from the oven, I remember why I started baking in the first place.
Recipe FAQs
- → What makes this different from regular bread?
-
The lamination process creates distinct flaky layers throughout the loaf. By incorporating cold butter through folding and rolling, you get that signature croissant texture that's entirely different from standard sandwich bread.
- → Why does the dough need so much chilling time?
-
Cold keeps the butter firm during rolling. If the butter softens, it merges into the dough rather than creating separate layers. Each chill ensures the butter stays distinct, which is essential for achieving those flaky layers.
- → Can I reduce the number of folding turns?
-
You can, but you'll get fewer layers and a denser texture. The three turns specified create 27 layers, which gives the ideal balance of flakiness and structure. Fewer turns result in a more bread-like texture.
- → How do I know when it's fully baked?
-
The loaf should be deeply golden brown and sound hollow when tapped on the bottom. An instant thermometer inserted into the center should read at least 190°F. If the top browns too quickly, tent with foil.
- → Can I make this ahead of time?
-
The dough can be prepared through the final folding step, wrapped tightly, and refrigerated overnight. Let it come to room temperature slightly before the final roll and shape. Already baked loaves freeze well for up to a month.
- → What if I don't have a loaf pan?
-
You can shape the dough into a traditional baguette or round boule on a baking sheet. The baking time may vary slightly—check for doneness a few minutes earlier since free-form shapes bake faster than loaf pans.
